Introduction
The Dope Sheet.
The Dope Sheet gives the animator a birds-eye-view of the keyframes inside the scene.
The Dope Sheet is inspired by classical hand-drawn animation process, in which animators will make use of a chart, showing exactly when each drawing, sound and camera move will occur, and for how long. This is called an exposure sheet or ‘dope sheet’. While CG foundations dramatically differ from classical hand-drawn animation, Blender’s Dope Sheet inherits a similar directive.
Dope Sheet Modes

Dope Sheet modes.
While the Dope Sheet Mode allows you to edit multiple actions at once, the other ones are dedicated to view and edit specific data-blocks used in different context of animation.
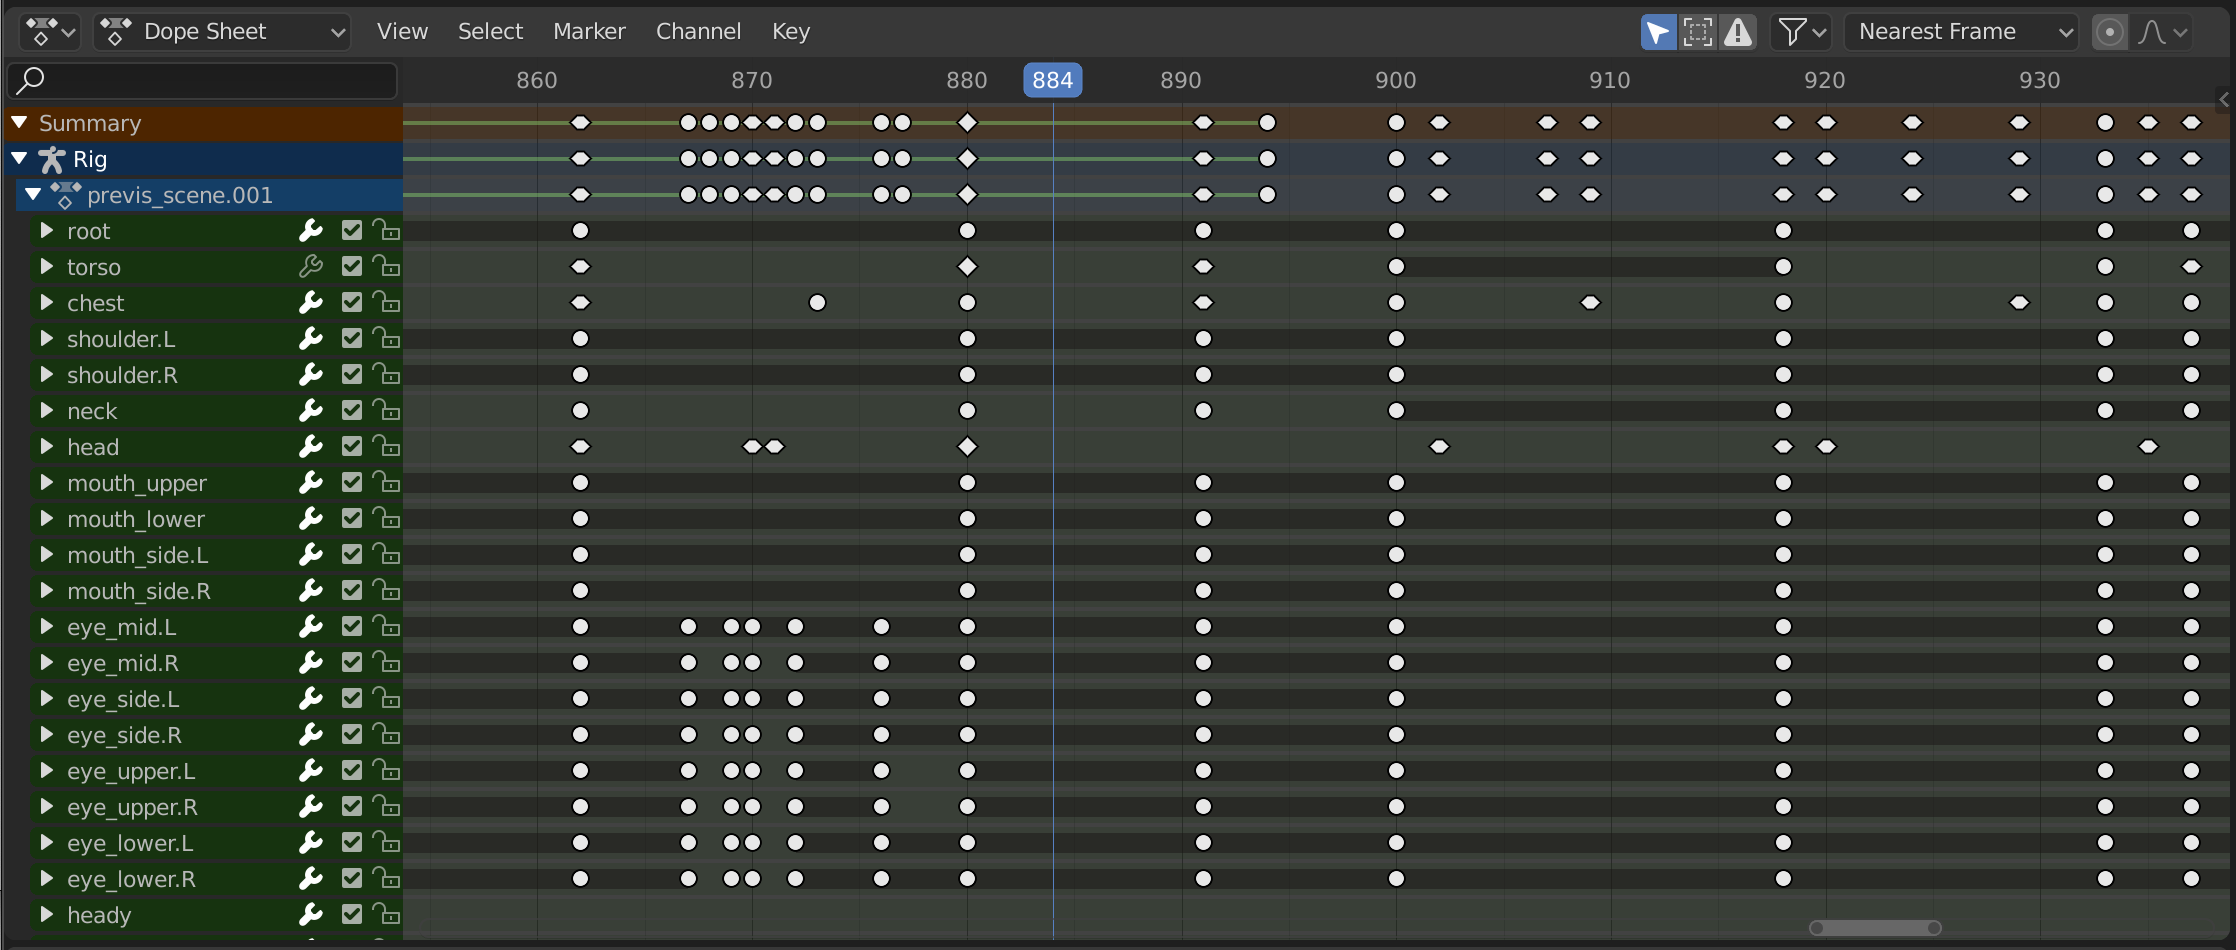
Dope Sheet
Cache File: Alembic Todo 2.78.
Main Region
Navigation
As with most editors, you can:
Pan
Pan the view vertically (values) or horizontally (time) with click and drag (MMB).
Zoom
Zoom in and out with the mouse wheel (Wheel).
Scale View
Scale the view vertically or horizontally (Ctrl-MMB).
In addition, you can also use the scrollbars to pan and zoom the view.
Keyframes
The Dope Sheet Editor with object channels.
This area contains keyframes for all visible action channels. As with the other time-based editors, the X axis represents time. The Y axis represents a stack of action channels.
On these channels lay the keyframes, which can show different information:
Gray | Unselected |
Yellow | Selected |
Diamond | Free Keyframe Handle |
Round | Auto-Clamped Keyframe Handle |
Circle | Automatic Keyframe Handle |
Square | Vector Keyframe Handle |
Rhombus | Aligned Keyframe Handle |
Various colors | These represent custom keyframe tags set by the user (Key ‣ Keyframe Type) |
Gray bar between keys | Held key (the two keyframes are identical) |
Green line between keys | Fixed keyframe interpolation (set in Key ‣ Interpolation Mode) |
Upwards arrow | Maximum Extreme keyframe (visible if View ‣ Show Curve Extremes are enabled) |
Downwards arrow | Minimum Extreme keyframe (visible if View ‣ Show Curve Extremes are enabled) |
A diagonal hash fill in the background is used to display the Manual Frame Range of the action the channel belong to.
Selecting Keyframes
Selection tools are available in the Select menu in the header, and the main shortcuts are listed below:
Selecting
Click on a key to select it. Hold Shift to extend the current selection.
Box Selecting
Click and drag to box select multiple keyframes at once. You can hold Shift to extend or Ctrl to subtract from the current selection.
Select Lasso
See Select Lasso.
Select/Deselect All
To select all keys, press A.
To deselect all keys, press Alt-A.
To inverse the selection, press Ctrl-I.
Before/After Current Frame [, ]
Select all to the right or left. Or hold Shift-Ctrl and click on either side of the Playhead.
See the Select menu for a full list of selection tools.
Manipulating Keyframes
Keyframe tools are available in the Key menu in the header, and the main shortcuts listed below:
Moving Keyframes
To move a single keyframe, click and drag on a key. To move multiple keyframes, make sure several keys are selected and press G.
Scaling Keyframes
To scale (stretch) selected keys, press S.
Extending Keyframes
To extend the time between two keys, select all with A, place the Playhead between two keyframes and press E.
Sliding Keyframes
To slide, position the mouse at the point where the sliding should start (between first and last selected keyframes) and press Shift-T. For more precision it is recommended to disable keyframes auto-snap.
See the Key menu for a full list of selection tools.
Channels Region
The Action editor’s channels region.
See Channels.
Header
Here you find the menus, a first group of controls related to the editor “mode”, a second one concerning the action data-blocks, and a few other tools (like the copy/paste buttons, and snapping type).
View Menu
Sidebar N
Show or hide the Sidebar Region.
Adjust Last Operation
Displays a pop-up panel to alter properties of the last completed operation. See Adjust Last Operation.
Channels
Show or hide the Channels Region.
Frame Selected NumpadPeriod
Reset viewable area to show selected keyframes.
Frame All Home
Reset viewable area to show all keyframes.
Go to Current Frame Numpad0
Centers the area to the Playhead.
Multi-Word Match Search
Fuzzy/Multi-Word name filtering matches word snippets/partial words, instead of having to match everything. It breaks down the search text based on whitespace placement. e.g. “lo ro” will filter all location and rotation, while “lc rt” will not work.
Realtime Updates
When transforming keyframes, changes to the animation data are propagated to other views.
Show Sliders
A toggle option that shows the value sliders for the channels. See the Fig. The Action editor’s channels region..
Handle types.
Show Handles and Interpolation
Instead of displaying all keyframes as diamonds, different icons are used to show the Bézier handle type. When curves use a different interpolation type, a line is shown between keys to highlight that.
See Handles & Interpolation Display.
Extreme markers.
Show Curve Extremes
Detect keys where the curve changes direction based on comparing with the adjacent key values, and display that by changing the keyframe icons to resemble an arrow. A muted version of the icon is used if the curve overshoots the extreme, or for groups with different results for contained curves.
Auto-Merge Keyframes
Automatically merge nearby keyframes.
Show Markers
Shows the markers region. When disabled, the Markers Menu is also hidden and markers operators are not available in this editor.
Show Seconds Ctrl-T
Show timing in seconds not frames.
Sync Visible Range
It synchronizes the horizontal panning and scale of the current editor with the other editors (Graph, Dope Sheet, NLA, and Sequencer) when this option is set. That way you always have these editors showing the same section of frames.
Set Preview Range P
Interactively define frame range used for playback. Allows you to define a temporary preview range to use for animation playback (this is the same thing as the Playback Range option of the Timeline editor header).
Clear Preview Range Alt-P
Clears the preview range.
Set Preview Range to Selected Ctrl-Alt-P
Sets the preview range to playback the selected NLA strips.
Toggle Graph Editor
Changes the area’s editor to the Graph Editor.
Area
Area controls, see the user interface documentation for more information.
See also
- See Timeline’s View Menu.
Markers Menu
Markers are used to denote frames with key points or significant events within an animation. Like with most animation editors, markers are shown at the bottom of the editor.
Markers in animation editor.
There are some options that are exclusive to the Dope Sheet editor:
Sync Markers
Sync Markers with keyframe edits.
Show Pose Markers
Available in Action and Shape Key modes. Shows pose markers owned by the active action instead of the scene ones.
Make Markers Local
Available in Action and Shape Key modes. Converts selected scene markers in pose markers, assigning them to the active action.
For more information and the description of the other marker tools, see Editing Markers.
Key Menu
Keyframe Type R
Sets the Keyframe Types of the selected keyframes.
See F-Curve.
Filters
Only Show Selected
Only include keyframes related to the selected item this item could be sequencer strips, nodes, objects, or any other type of data.
Show Hidden
Include keyframes from objects or bones that are not visible.
Only Show Errors
Only include curves and drivers that are disabled or have errors. Useful for debugging.
Filter by Type
Filter curves by property type.
Filtering Collection
Select a collection to only show keyframes from objects contained in that collection.
Sort Data-Blocks
Objects data-blocks appear in alphabetical order, so that it is easier to find where they occur (as well as helping to keep the animation of related objects together in the NLA editor for instance).
If you find that your playback speed suffers from this being enabled (it should only really be an issue when working with lots of objects in the scene), you can turn this off.
Summary
Toggles the “Dope Sheet Summary” channel at the top of the Channels Region. This is used to give an overview of all the channels by combining all the actions into one channel.
Sidebar Region
Action Panel
Actions with and without a Manual Frame Range in Dope Sheet.
When the editor is in the Action mode, or a channel belonging to an action is selected in Dope Sheet mode, this panel allows changing some settings of the selected action, specifically the Manual Frame Range.
Custom Properties
Create and manage your own properties to store data in the action’s data block. See the Custom Properties page for more information.