基本介绍
ES6 提供了新的数据结构 Set。
它类似于数组,但是成员的值都是唯一的,没有重复的值。
初始化
Set 本身是一个构造函数,用来生成 Set 数据结构。
- let set = new Set();
Set 函数可以接受一个数组(或者具有 iterable 接口的其他数据结构)作为参数,用来初始化。
- let set = new Set([1, 2, 3, 4, 4]);
- console.log(set); // Set(4) {1, 2, 3, 4}
- set = new Set(document.querySelectorAll('div'));
- console.log(set.size); // 66
- set = new Set(new Set([1, 2, 3, 4]));
- console.log(set.size); // 4
属性和方法
操作方法有:
- add(value):添加某个值,返回 Set 结构本身。
- delete(value):删除某个值,返回一个布尔值,表示删除是否成功。
- has(value):返回一个布尔值,表示该值是否为 Set 的成员。
- clear():清除所有成员,无返回值。
举个例子:
- let set = new Set();
- console.log(set.add(1).add(2)); // Set [ 1, 2 ]
- console.log(set.delete(2)); // true
- console.log(set.has(2)); // false
- console.log(set.clear()); // undefined
- console.log(set.has(1)); // false
之所以每个操作都 console 一下,就是为了让大家注意每个操作的返回值。
遍历方法有:
- keys():返回键名的遍历器
- values():返回键值的遍历器
- entries():返回键值对的遍历器
- forEach():使用回调函数遍历每个成员,无返回值
注意 keys()、values()、entries() 返回的是遍历器
- let set = new Set(['a', 'b', 'c']);
- console.log(set.keys()); // SetIterator {"a", "b", "c"}
- console.log([...set.keys()]); // ["a", "b", "c"]
- let set = new Set(['a', 'b', 'c']);
- console.log(set.values()); // SetIterator {"a", "b", "c"}
- console.log([...set.values()]); // ["a", "b", "c"]
- let set = new Set(['a', 'b', 'c']);
- console.log(set.entries()); // SetIterator {"a", "b", "c"}
- console.log([...set.entries()]); // [["a", "a"], ["b", "b"], ["c", "c"]]
- let set = new Set([1, 2, 3]);
- set.forEach((value, key) => console.log(key + ': ' + value));
- // 1: 1
- // 2: 2
- // 3: 3
属性:
- Set.prototype.constructor:构造函数,默认就是 Set 函数。
- Set.prototype.size:返回 Set 实例的成员总数。
模拟实现第一版
如果要模拟实现一个简单的 Set 数据结构,实现 add、delete、has、clear、forEach 方法,还是很容易写出来的,这里直接给出代码:
- /**
- * 模拟实现第一版
- */
- (function(global) {
- function Set(data) {
- this._values = [];
- this.size = 0;
- data && data.forEach(function(item) {
- this.add(item);
- }, this);
- }
- Set.prototype['add'] = function(value) {
- if (this._values.indexOf(value) == -1) {
- this._values.push(value);
- ++this.size;
- }
- return this;
- }
- Set.prototype['has'] = function(value) {
- return (this._values.indexOf(value) !== -1);
- }
- Set.prototype['delete'] = function(value) {
- var idx = this._values.indexOf(value);
- if (idx == -1) return false;
- this._values.splice(idx, 1);
- --this.size;
- return true;
- }
- Set.prototype['clear'] = function(value) {
- this._values = [];
- this.size = 0;
- }
- Set.prototype['forEach'] = function(callbackFn, thisArg) {
- thisArg = thisArg || global;
- for (var i = 0; i < this._values.length; i++) {
- callbackFn.call(thisArg, this._values[i], this._values[i], this);
- }
- }
- Set.length = 0;
- global.Set = Set;
- })(this)
我们可以写段测试代码:
- let set = new Set([1, 2, 3, 4, 4]);
- console.log(set.size); // 4
- set.delete(1);
- console.log(set.has(1)); // false
- set.clear();
- console.log(set.size); // 0
- set = new Set([1, 2, 3, 4, 4]);
- set.forEach((value, key, set) => {
- console.log(value, key, set.size)
- });
- // 1 1 4
- // 2 2 4
- // 3 3 4
- // 4 4 4
模拟实现第二版
在第一版中,我们使用 indexOf 来判断添加的元素是否重复,本质上,还是使用 === 来进行比较,对于 NaN 而言,因为:
- console.log([NaN].indexOf(NaN)); // -1
模拟实现的 Set 其实可以添加多个 NaN 而不会去重,然而对于真正的 Set 数据结构:
- let set = new Set();
- set.add(NaN);
- set.add(NaN);
- console.log(set.size); // 1
所以我们需要对 NaN 这个值进行单独的处理。
处理的方式是当判断添加的值是 NaN 时,将其替换为一个独一无二的值,比如说一个很难重复的字符串类似于 @@NaNValue,当然了,说到独一无二的值,我们也可以直接使用 Symbol,代码如下:
- /**
- * 模拟实现第二版
- */
- (function(global) {
- var NaNSymbol = Symbol('NaN');
- var encodeVal = function(value) {
- return value !== value ? NaNSymbol : value;
- }
- var decodeVal = function(value) {
- return (value === NaNSymbol) ? NaN : value;
- }
- function Set(data) {
- this._values = [];
- this.size = 0;
- data && data.forEach(function(item) {
- this.add(item);
- }, this);
- }
- Set.prototype['add'] = function(value) {
- value = encodeVal(value);
- if (this._values.indexOf(value) == -1) {
- this._values.push(value);
- ++this.size;
- }
- return this;
- }
- Set.prototype['has'] = function(value) {
- return (this._values.indexOf(encodeVal(value)) !== -1);
- }
- Set.prototype['delete'] = function(value) {
- var idx = this._values.indexOf(encodeVal(value));
- if (idx == -1) return false;
- this._values.splice(idx, 1);
- --this.size;
- return true;
- }
- Set.prototype['clear'] = function(value) {
- ...
- }
- Set.prototype['forEach'] = function(callbackFn, thisArg) {
- ...
- }
- Set.length = 0;
- global.Set = Set;
- })(this)
写段测试用例:
- let set = new Set([1, 2, 3]);
- set.add(NaN);
- console.log(set.size); // 3
- set.add(NaN);
- console.log(set.size); // 3
模拟实现第三版
在模拟实现 Set 时,最麻烦的莫过于迭代器的实现和处理,比如初始化以及执行 keys()、values()、entries() 方法时都会返回迭代器:
- let set = new Set([1, 2, 3]);
- console.log([...set]); // [1, 2, 3]
- console.log(set.keys()); // SetIterator {1, 2, 3}
- console.log([...set.keys()]); // [1, 2, 3]
- console.log([...set.values()]); // [1, 2, 3]
- console.log([...set.entries()]); // [[1, 1], [2, 2], [3, 3]]
而且 Set 也支持初始化的时候传入迭代器:
- let set = new Set(new Set([1, 2, 3]));
- console.log(set.size); // 3
当初始化传入一个迭代器的时候,我们可以根据我们在上一篇 《ES6 系列之迭代器与 for of》中模拟实现的 forOf 函数,遍历传入的迭代器的 Symbol.iterator 接口,然后依次执行 add 方法。
而当执行 keys() 方法时,我们可以返回一个对象,然后为其部署 Symbol.iterator 接口,实现的代码,也是最终的代码如下:
- /**
- * 模拟实现第三版
- */
- (function(global) {
- var NaNSymbol = Symbol('NaN');
- var encodeVal = function(value) {
- return value !== value ? NaNSymbol : value;
- }
- var decodeVal = function(value) {
- return (value === NaNSymbol) ? NaN : value;
- }
- var makeIterator = function(array, iterator) {
- var nextIndex = 0;
- // new Set(new Set()) 会调用这里
- var obj = {
- next: function() {
- return nextIndex < array.length ? { value: iterator(array[nextIndex++]), done: false } : { value: void 0, done: true };
- }
- };
- // [...set.keys()] 会调用这里
- obj[Symbol.iterator] = function() {
- return obj
- }
- return obj
- }
- function forOf(obj, cb) {
- let iterable, result;
- if (typeof obj[Symbol.iterator] !== "function") throw new TypeError(obj + " is not iterable");
- if (typeof cb !== "function") throw new TypeError('cb must be callable');
- iterable = obj[Symbol.iterator]();
- result = iterable.next();
- while (!result.done) {
- cb(result.value);
- result = iterable.next();
- }
- }
- function Set(data) {
- this._values = [];
- this.size = 0;
- forOf(data, (item) => {
- this.add(item);
- })
- }
- Set.prototype['add'] = function(value) {
- value = encodeVal(value);
- if (this._values.indexOf(value) == -1) {
- this._values.push(value);
- ++this.size;
- }
- return this;
- }
- Set.prototype['has'] = function(value) {
- return (this._values.indexOf(encodeVal(value)) !== -1);
- }
- Set.prototype['delete'] = function(value) {
- var idx = this._values.indexOf(encodeVal(value));
- if (idx == -1) return false;
- this._values.splice(idx, 1);
- --this.size;
- return true;
- }
- Set.prototype['clear'] = function(value) {
- this._values = [];
- this.size = 0;
- }
- Set.prototype['forEach'] = function(callbackFn, thisArg) {
- thisArg = thisArg || global;
- for (var i = 0; i < this._values.length; i++) {
- callbackFn.call(thisArg, this._values[i], this._values[i], this);
- }
- }
- Set.prototype['values'] = Set.prototype['keys'] = function() {
- return makeIterator(this._values, function(value) { return decodeVal(value); });
- }
- Set.prototype['entries'] = function() {
- return makeIterator(this._values, function(value) { return [decodeVal(value), decodeVal(value)]; });
- }
- Set.prototype[Symbol.iterator] = function(){
- return this.values();
- }
- Set.prototype['forEach'] = function(callbackFn, thisArg) {
- thisArg = thisArg || global;
- var iterator = this.entries();
- forOf(iterator, (item) => {
- callbackFn.call(thisArg, item[1], item[0], this);
- })
- }
- Set.length = 0;
- global.Set = Set;
- })(this)
写段测试代码:
- let set = new Set(new Set([1, 2, 3]));
- console.log(set.size); // 3
- console.log([...set.keys()]); // [1, 2, 3]
- console.log([...set.values()]); // [1, 2, 3]
- console.log([...set.entries()]); // [1, 2, 3]
QUnit
由上我们也可以发现,每当我们进行一版的修改时,只是写了新的测试代码,但是代码改写后,对于之前的测试代码是否还能生效呢?是否不小心改了什么导致以前的测试代码没有通过呢?
为了解决这个问题,针对模拟实现 Set 这样一个简单的场景,我们可以引入 QUnit 用于编写测试用例,我们新建一个 HTML 文件:
- <!DOCTYPE html>
- <html>
- <head>
- <meta charset="utf-8">
- <meta name="viewport" content="width=device-width">
- <title>Set 的模拟实现</title>
- <link rel="stylesheet" href="qunit-2.4.0.css">
- </head>
- <body>
- <div id="qunit"></div>
- <div id="qunit-fixture"></div>
- <script src="qunit-2.4.0.js"></script>
- <script src="polyfill-set.js"></script>
- <script src="test.js"></script>
- </body>
- </html>
编写测试用例,因为语法比较简单,我们就直接看编写的一些例子:
- QUnit.test("unique value", function(assert) {
- const set = new Set([1, 2, 3, 4, 4]);
- assert.deepEqual([...set], [1, 2, 3, 4], "Passed!");
- });
- QUnit.test("unique value", function(assert) {
- const set = new Set(new Set([1, 2, 3, 4, 4]));
- assert.deepEqual([...set], [1, 2, 3, 4], "Passed!");
- });
- QUnit.test("NaN", function(assert) {
- const items = new Set([NaN, NaN]);
- assert.ok(items.size == 1, "Passed!");
- });
- QUnit.test("Object", function(assert) {
- const items = new Set([{}, {}]);
- assert.ok(items.size == 2, "Passed!");
- });
- QUnit.test("set.keys", function(assert) {
- let set = new Set(['red', 'green', 'blue']);
- assert.deepEqual([...set.keys()], ["red", "green", "blue"], "Passed!");
- });
- QUnit.test("set.forEach", function(assert) {
- let temp = [];
- let set = new Set([1, 2, 3]);
- set.forEach((value, key) => temp.push(value * 2) )
- assert.deepEqual(temp, [2, 4, 6], "Passed!");
- });
用浏览器预览 HTML 页面,效果如下图:
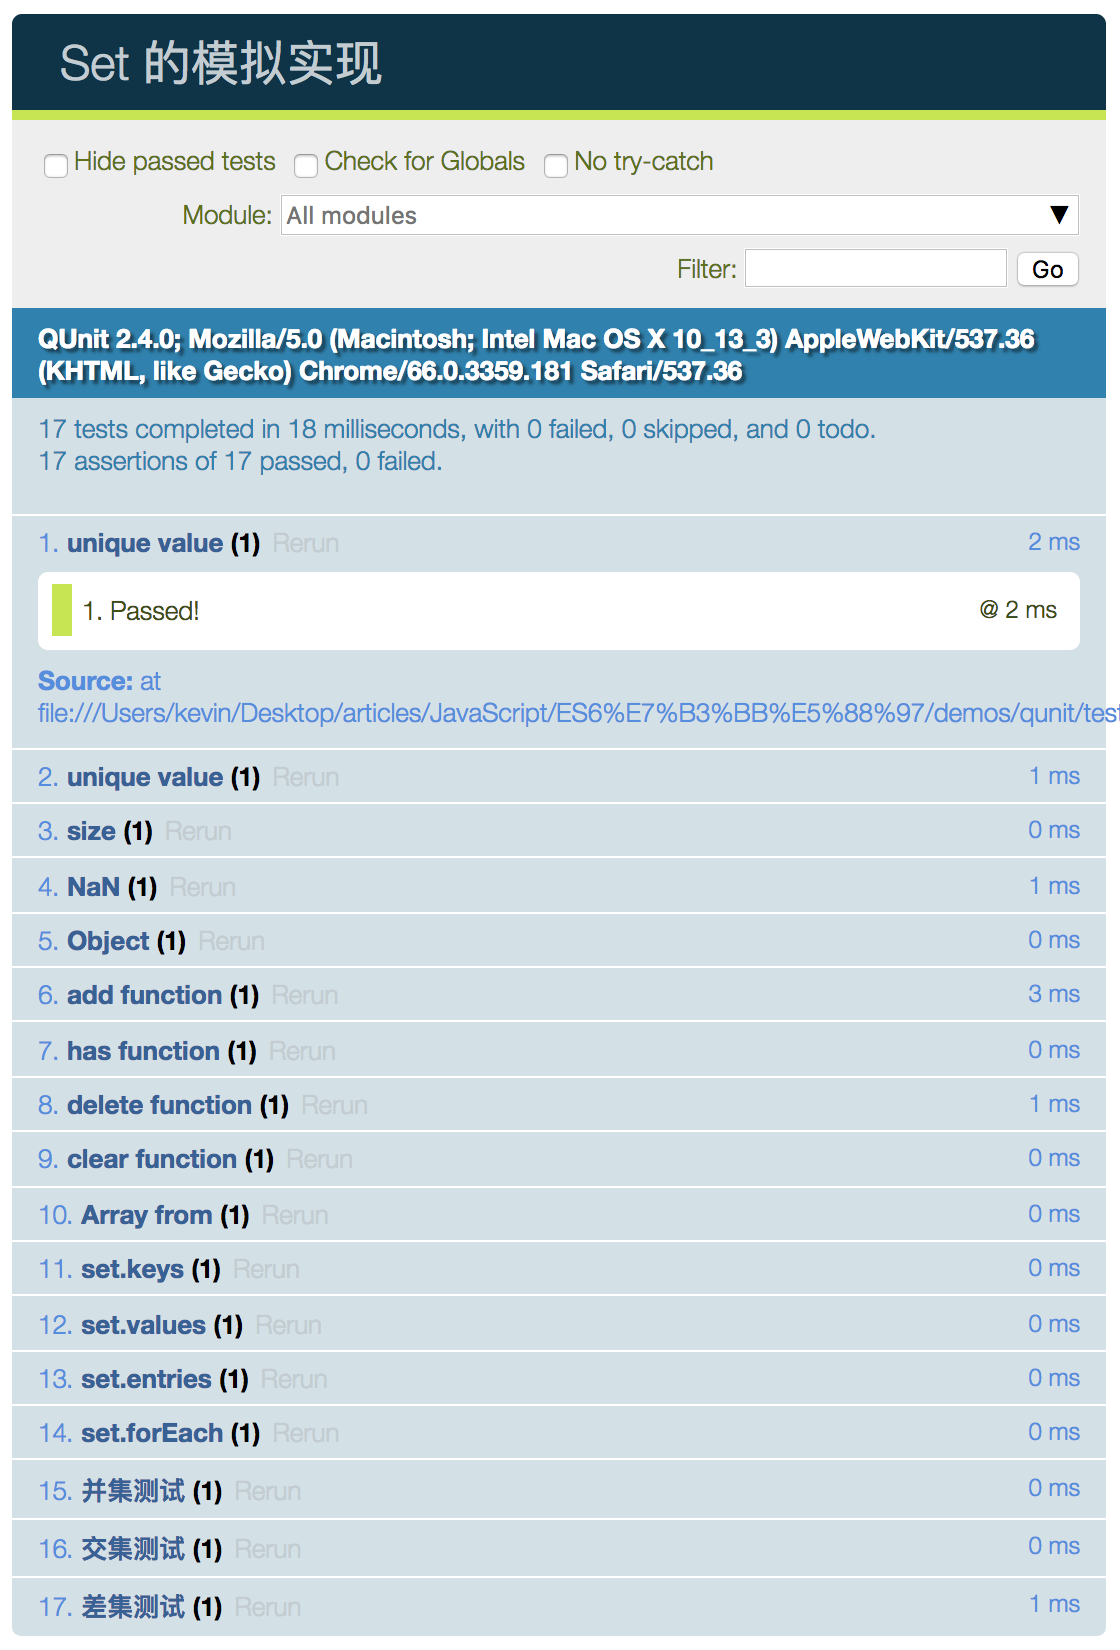
完整的 polyfill 及 Qunit 源码在 https://github.com/mqyqingfeng/Blog/tree/master/demos/qunit。
ES6 系列
ES6 系列目录地址:https://github.com/mqyqingfeng/Blog
ES6 系列预计写二十篇左右,旨在加深 ES6 部分知识点的理解,重点讲解块级作用域、标签模板、箭头函数、Symbol、Set、Map 以及 Promise 的模拟实现、模块加载方案、异步处理等内容。
如果有错误或者不严谨的地方,请务必给予指正,十分感谢。如果喜欢或者有所启发,欢迎 star,对作者也是一种鼓励。